How to create a CustomeLIstView with CustomeCell in Xamarin.Forms

We have learned how to create simple listview in the previous demo application now we are going to create a Customelistview for displaying images along with their names in the listview for that we have made some changes to the previous project.
Goto the “ListViewXamarinForms.cs” file and make the following changes to it.
Create a class name “data” add two string variable named “Img”and”Name”.
|
1 2 |
public string Name { get; set;} public string Img { get; set;} |
Next in the constructor of the newly created class add the following code into it.
|
1 2 3 4 5 |
public data(string name,string img) { this.Name=name; this.Img=img; } |
Now in the constructor of the main class “App” creates a new variable named “img” and assign it the memory for storing an image.
Now that we have created a variable for the image we have to assign an image to the newly created image by adding the following lines to it.
|
1 2 |
var img = new Image (); img.Source="Default.png"; |
“Default.png” is the default image name,that is stored in the resource folder of the project.
Now to set the image with the name of it we have to create a List and the type of the list will be the newly created class “data”.
The following code creates a list.
|
1 |
List<data> data = new List<data> |
Now we have to add the data to the newly created list remember that we can not add data to the list by using the “Add” function because we have created List of the class type not the inbuilt user defined type.
For that we have to use the constructor of the class “data” the code is given below for adding data to the list
|
1 2 3 4 5 6 7 8 9 10 11 |
List<data> data = new List<data> { new data ("Apple", "contact.png"), new data("Banana", "contact.png"), new data ("Graps", "contact.png"), new data("Orange", "contact.png"), new data("Pineapple", "contact.png"), new data("Strawberry", "contact.png"), new data("Lemon", "contact.png"), }; |
In the above snippet of the code we have called the constructor of the class “data” and the arguments re the name of the item and the image for it.
To display the header at the top of the listview we have to add the following code.
|
1 2 3 4 5 6 7 |
Label header = new Label { Text = "ListView Custom Cell", Font = Font.BoldSystemFontOfSize(30), HorizontalOptions = LayoutOptions.Center }; |
We have to create a cell and a list view for that adds the following code.
|
1 2 3 4 5 6 7 8 |
var Cell = new DataTemplate (typeof(ListCell)); ListView listview= new ListView { ItemsSource= data, ItemTemplate = Cell }; |
Note that we have to set the itemsource as the “data” and itemtemplate as the newly created “cell”.
Now we have to add the listview and the header to the layout for it add the following code.
|
1 2 3 4 5 6 7 8 9 10 11 |
MainPage = new ContentPage { Content = new StackLayout { Padding= new Thickness(0,15,0,0), VerticalOptions = LayoutOptions.Center, Children = { header,listview } } }; |
Now create an new file and name it as “ListCell.cs”
First of all inherit the “ViewCell” to the ListCell class for using the cell.
We have to first display an image on the starting of the layout so we have to add the following code to the constructor of the class.
|
1 2 3 4 |
var img_image = new Image () { HorizontalOptions = LayoutOptions.Start }; |
To set the height and the width of the image add the following code.
|
1 |
img_image.WidthRequest = img_image.HeightRequest = 40; |
We have to set the binding of the img_image as follows.
|
1 |
img_image.SetBinding (Image.SourceProperty, "Img"); |
Next we arte going to create a new layout and we will be using the img_image in that layout so this variable will be referred as “Img” in the newly created layout for that we will need to have binding.
We have to call a function and later on we will see the implementation of it.
|
1 |
var nameLayout = CreateNameLayout(); |
Now we are going to create a new layout of the type “StackLayout” and set the orientation and the children of that layout add the following code.
|
1 2 3 4 5 6 |
var viewLayout = new StackLayout() { Orientation = StackOrientation.Horizontal, Children = { img_image, nameLayout } }; View = viewLayout; |
The above code will set the current view as the newly created ViewLayout.
Now we have to give the implementation of the function “CreateNameLayout”. In the body of the function we area going to create a new label and set the binding of the newly created label as follows.
We also have to create a new layout which we area going to return from the function and set the newly created label as the children of the newly created layout.
At the end of the function return the layout to from where we are calling our function.
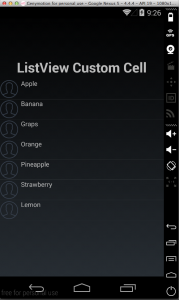
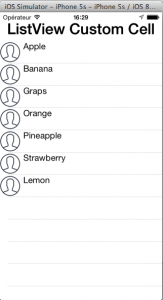
Now run your application on both android and iOS and see examine the simulator of both of them.
If you like this tutorial then you can download full copy of the code from github.
Leave a Reply