How to create Action sheets using Xamarin iOS.

In this tutorial we are going to see some basic controls that are needed to develop a regular application like:
- ActionSheet
- Buttons
- Label
- ImageView
ActionSheet: Action sheets consist of a really convenient and fast way to display a bunch of options that the user should select from, and it is widely used in great number of applications. Its disadvantage though is that it adopts the iOS’s look and feel without being able to be graphically modified; therefore it might not fit to applications with customized GUI.
We are going to see a small tutorial that display ActionSheet when press on certain buttons. When we complete our tutorial it will look like this:
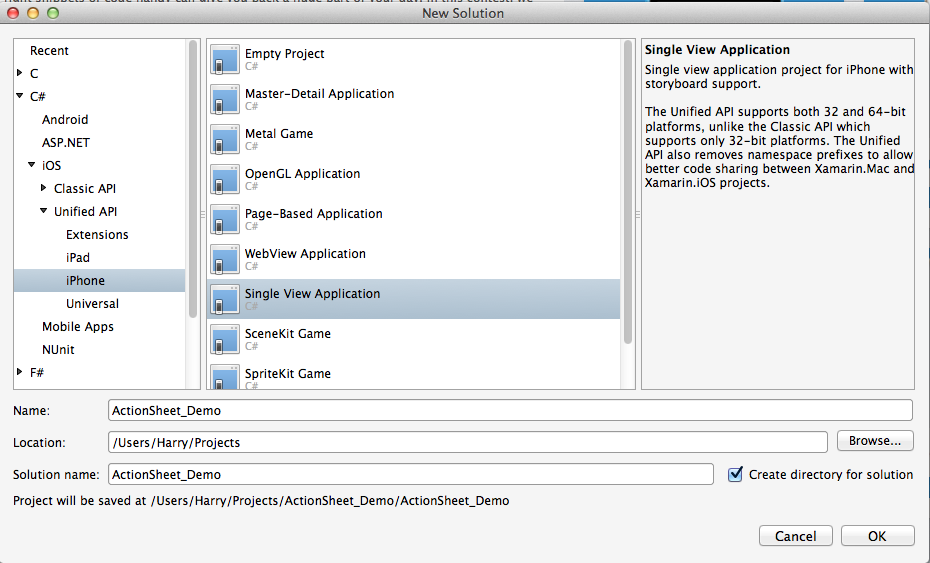
Select Unified API and iPhone , we are going to need only 1 screen so we are taking Single View Application. Give name of application “ActionSheet_Demo”.
Let’s begin: Go on New Solution and create new iOS solution.

Select Unified API and iPhone , we are going to need only 1 screen so we are taking Single View Application. Give name of application “ActionSheet_Demo”.
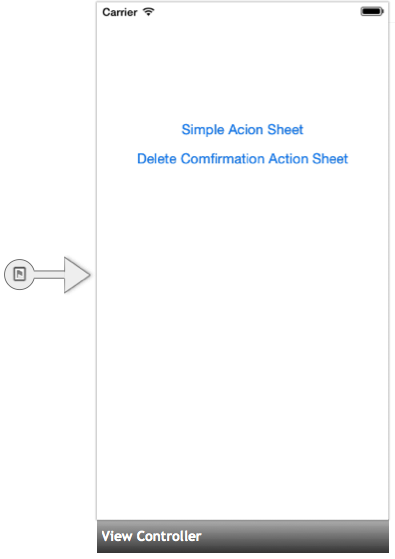
Now we get a blank storyboard where we take 2 buttons for using storyboard. When you clink on these buttons it invokes a ActionSheet controller.
Now go and declare name in identity to access button click event or touch up inside. Here we give btn_normal for Simple Action Sheet and btn_option for Delete Confirmation Action Sheet.
In ActionSheet_DemoViewController file declare UIActionSheet object.
|
1 2 3 4 5 |
public partial class ActionSheet_DemoViewController : UIViewController { UIActionSheet normal; UIActionSheet option; } |
Now go in ViewDidLoad method and write code below
|
1 2 3 4 5 6 7 8 |
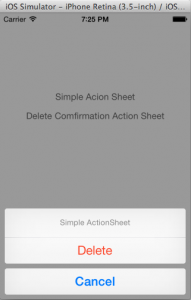
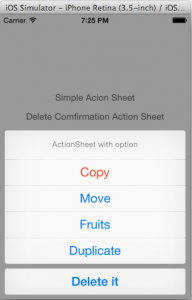
public override void ViewDidLoad () { string[] tableItems = new string[] {"Move","Fruits","Duplicate"}; base.ViewDidLoad (); normal = new UIActionSheet ("Simple ActionSheet", null, "Cancel", "Delete", n ull); option = new UIActionSheet ("ActionSheet with option", null, "Delete it", "Copy", tableItems); } |
We’re almost done here, now just call the object ob UIActionSheet and you get ActionSheet.
Find TouchUpInside method of buttons that we were created earlier and call actionsheet method with the help of object.
Write the code below to get it done:
|
1 2 3 4 5 6 7 8 9 |
partial void btn_normal_TouchUpInside (UIButton sender) { normal.ShowInView (View); } partial void btn_delete_TouchUpInside (UIButton sender) { option.ShowInView (View); } |
We’ve created UIActionSheet object and used with button actions but what about using this actionsheet buttons???
For that, we’ve to use
|
1 2 3 |
normal.Clicked += (btn_sender, args) => Console.WriteLine("{0} Clicked", args.ButtonIndex); and option.Clicked += (btn_sender, args) => Console.WriteLine("{0} Clicked", args.ButtonIndex); |
Add these lines before you call the methods of ActionSheet ShowInView in button action event.
And that’s it, you get index number of button in your Application Output. Just run and check it.

If you like this tutorial then you can download full copy of the code from github.
Leave a Reply