How to handle Row selection and delete a Row in UITableView using Xamarin iOS.

In our last tutorial we have seen how to create a custom cell in TableView to display our custom contents. In this tutorial we are going to see how to access the row selection and delete the row from TableView.
After we complete our tutorial it will look like:
Let’s Start:
In our last tutorial we have seen how to create a simple table view and how to create a custom table cell. Just refer our previous tutorial because we are going to continue from there.
Handle Row Selection:
To handle user row selection we have to override RowSelection method UITableViewSource, using NSIndexPath indexpath to determine which row was selected.
Just add this method in TableSource:
|
1 2 3 4 5 6 |
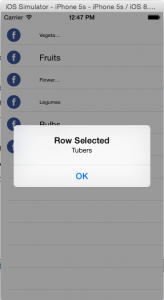
public override void RowSelected (UITableView tableView, Foundation.NSIndexPath indexPath) { new UIAlertView("Row Selected", itemData[indexPath.Row], null, "OK", null).Show(); tableView.DeselectRow (indexPath, true); // iOS convention is to remove the highlight } |
Now try to run the project and you will get your selected row in Alert.

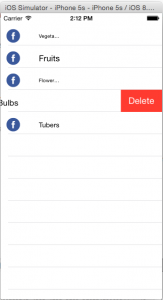
Delete a row in TableView by Swipe:
To delete a row in TableView you have to override a method in UITableViewSource subclass.It provides swipe to delete gesture that can implemented with single mode override.
There are 3 method override that affect the swipe gesture to show a Delete button in cell:
CommitEditingStyle:
The table source detects if this method is overridden and automatically enables the swipe-to-delete gesture. The method’s implementation should call DeleteRows on the UITableView to cause the cells to disappear, and also remove the underlying data from your model (for example, an array, dictionary or database).
CanEditRow: If CommitEditingStyle is overridden, all rows are assumed to be editable. If this method is implemented and returns false (for some specific rows, or for all rows) then the swipe-to-delete gesture will not be available in that cell.
TitleForDeleteConfirmation: Optionally specifies the text for the Delete button. If this method is not implemented the button text will be “Delete”.
Before going to start the code we have to understand that we cannot simply delete data from array, so we have to take a List to perform this operation.
So first, create a List of String type and insert data into it in ViewDidLoad method of CustomCellTableview_iOSViewController.
Now your ViewDidLoad should look like this:
|
1 2 3 4 5 6 7 8 9 10 11 12 |
public override void ViewDidLoad () { base.ViewDidLoad (); List<string> itemData= new List<string>(); itemTable.Add ("Vegetables"); itemTable.Add ("Fruits"); itemTable.Add ("Flower Buds"); itemTable.Add ("Legumes"); itemTable.Add ("Bulbs"); itemTable.Add ("Tubers"); tableData.Source = new TableSource (itemData); } |
Then we have to also update our TableSource file because we pass string array in its constructor and now we have a List.
So in TableSource.cs file we have to change the Constructor and in override method RowsInSection we have to change accounting to the List.
Your updated TableSource file will look like this:
|
1 2 3 4 5 6 7 8 9 10 11 12 13 14 15 16 17 |
namespace CustomCellTableview.iOS { public class TableSource : UITableViewSource { //string[] itemData; List<string> itemData= new List<string>(); string cellIdentifier="TableCell"; public TableSource (List<string> items) { itemData = items; } public override nint RowsInSection (UITableView tableview, nint section) { return itemData.Count; } } } |
Now we are going to user override method of CommitEditingStyle in our TableSource file, here we simply going to remove the data from itemData List and remove TableView row.
The finale code of these 3-override methods will look like:
|
1 2 3 4 5 6 7 8 9 10 11 12 13 14 15 16 17 18 19 20 21 22 23 |
public override void CommitEditingStyle (UITableView tableView, UITableViewCellEditingStyle editingStyle, Foundation.NSIndexPath indexPath) { switch (editingStyle) { case UITableViewCellEditingStyle.Delete: // remove the item from the underlying data source itemData.RemoveAt(indexPath.Row); // delete the row from the table tableView.DeleteRows (new NSIndexPath[] { indexPath }, UITableViewRowAnimation.Fade); break; case UITableViewCellEditingStyle.None: Console.WriteLine ("CommitEditingStyle:None called"); break; } } public override bool CanEditRow (UITableView tableView, Foundation.NSIndexPath indexPath) { return true; } public override string TitleForDeleteConfirmation (UITableView tableView, Foundation.NSIndexPath indexPath) { return "Delete"; } |
We are done with updating and inserting code for the Swipe to delete in our project. Try to build and run the project, if everything is ok as I mention then your app will look like this:
If you like this tutorial then you can download full copy of the code from github.
Leave a Reply